First tutorial! WOOHOOO!
Now back to business. I'm sure by now, you've heard of the Shattered Glass Nails that are super popular, it started off in South Korea and has taken the world by storm.
I love the look of these nails! There are multiple ways to recreate these nails at home.
1. I know that you can purchase Nail Stickers off the internet like these;
http://www.ebay.com/itm/Aritaum-Modi-Film-Nail-Sticker-2Set-Aritaum-Limited-Sticker-/281846043103?hash=item419f5551df:g:-xcAAOSwAYtWLwth
This way is convenient and easy as the sticker sticks right onto your nail no hassle.
2. You can also go to your local craft store and purchase a packet/sheet of iridescent cellophane.
This idea is awesome as it is a cheaper alternative and cellophane comes in massive sheets that will last for ages!
However, I've struggled to find cellophane as well as nail stickers that I was happy with (tbh I didn't really want to pay $10+ for it as well...) HOWEVER I was in my local Chemist/Drugstore the other day with my dear friend, and I stumbled upon this nail polish by W7.
This bottle of polish instantly stole my heart. It's pink, has huge pieces of iridescent glitter and best of all, it was only $2.99!!! I thought that I could pick out the pieces of glitter and use them to do my own take on the Shattered Glass Nails.
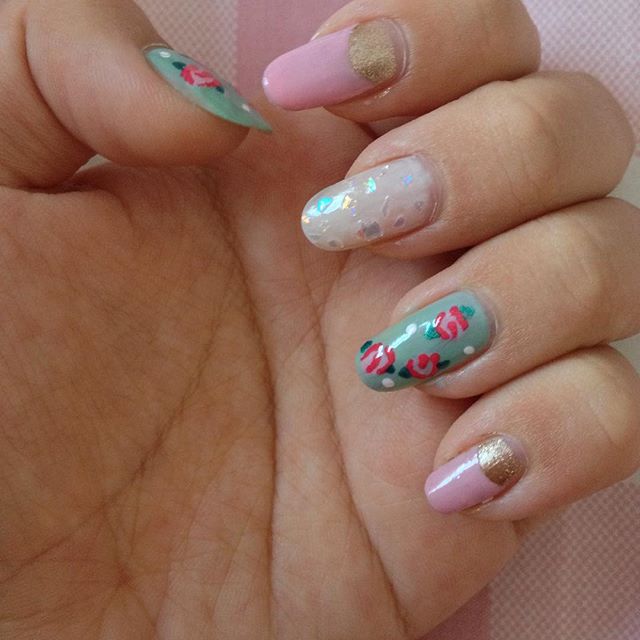
Ta-Dah!! I present to you my own take on the Shattered Glass Nail paired with Roses and a Half Moon Manicure. So without further ado, let's move on to the tutorial!
The colours I'll be using today are:
- Models Prefer: Money Money (Dark Green)
- Models Prefer: Sugar High (Pale Pink)
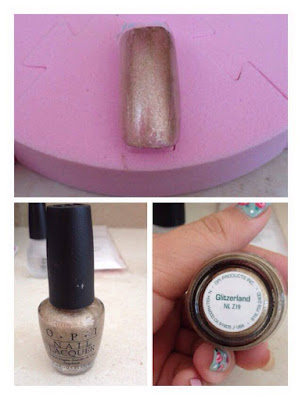
- OPI: Glitzerland (Gold)
- OPI: Charged Up Cherry (Hot Pink)
- Revlon: Eclectic (Blue/Green)
NOTE: Any blue/green polish works. I've used mint before (Revlon Jaded) and it looked awesome!
- Sally Hansen: First Blush (Lighter Pink)
- Sinful Colors: Snow Me White (White)
- Sinful Colors: Top Shine (Topcoat)
I only used these 4 'tools':
- Binder Rings
- Dotting Tool
- Cosmetic Sponges
- Toothpicks


Step 2: Once your nail is dry. Using binder rings, seal off the section you want to be gold and become the half moon.
Step 3: Paint 1-2 coats of pink onto the uncovered sections.

Step 4: Let it dry, add a topcoat and you're done.
Rose Nails (Thumb and Ring Finger)
I've looked around the internet and I've tried many different versions of roses and some of my favorites include the ones Bubzbeauty has done (click the link below)
Bubzbeauty's Rose Nail Tutorial
My current favorite way of doing rose nails is from the lovely blogger at 'Did My Nails' as shown in the image below:
Step 1: Paint your nails 2-3 coats a blue/green polish.

Step 2: Using a pale pink polish, create as many random splodges on your nail as you like. This will be the centre of your roses.

Step 3: Draw a curved line running down the middle of the pink blob.
Step 4: Draw a line around the outside of 1/2 of the pink blob.
Step 5: Draw a line around the outside on the other 1/2 of the blob.
NOTE: Make sure the lines do not touch.

Step 6: Using a green polish, draw a line on each side of the roses.
Step 7: Draw another green line creating a small triangle.

Step 8: Using a dotting tool, dot white dots in areas with no roses.


Here's a gif I made showing the process of drawing the roses:

Remember to use a fast drying topcoat on all your designs so you can protect all your hardwork.
This is currently my favourite topcoat:
Here's what the completed nails look like. Hope you enjoy :D

Voila! You are done! I hope you enjoyed the tutorial. Please feel free to leave comments telling me what you think, what you like and don't like and what tutorials you'd like to see next.
Until next time, byee ^-^
NOTE: I'm going to apologise, this is my first blog post so the pictures aren't of the best quality and I'm very sorry :(
 |
| http://www.bellanaija.com/wp-content/uploads/2015/10/Shattered-Glass-Nails-BellaNaija-October-2015001.jpg |
 |
| https://blogger.googleusercontent.com/img/b/R29vZ2xl/AVvXsEjn4WkE-6T_vhhJSHDDSkjZHH2caHPkmIbfCimio_eXZMqfegtQeVjh3lM0Zs8RpKxxIHtj57xYGdX5LlzSr6v_0GP9LTCoslc3zm_rdcojh5cUJzYHQf8HOxsCgA8J7NlcrX5CoCRneZY/s1600/F2.jpg |
 |
| http://www.getthegloss.com/media/image/glass-nails.jpg |
1. I know that you can purchase Nail Stickers off the internet like these;
http://www.ebay.com/itm/Aritaum-Modi-Film-Nail-Sticker-2Set-Aritaum-Limited-Sticker-/281846043103?hash=item419f5551df:g:-xcAAOSwAYtWLwth
This way is convenient and easy as the sticker sticks right onto your nail no hassle.
2. You can also go to your local craft store and purchase a packet/sheet of iridescent cellophane.
This idea is awesome as it is a cheaper alternative and cellophane comes in massive sheets that will last for ages!
However, I've struggled to find cellophane as well as nail stickers that I was happy with (tbh I didn't really want to pay $10+ for it as well...) HOWEVER I was in my local Chemist/Drugstore the other day with my dear friend, and I stumbled upon this nail polish by W7.
 |
| W7: 167 Pink Flakes |
 |
| © Tips for Fingertips |
The colours I'll be using today are:
- Models Prefer: Money Money (Dark Green)
- Models Prefer: Sugar High (Pale Pink)
- OPI: Glitzerland (Gold)
- OPI: Charged Up Cherry (Hot Pink)
- Revlon: Eclectic (Blue/Green)
NOTE: Any blue/green polish works. I've used mint before (Revlon Jaded) and it looked awesome!
- Sally Hansen: First Blush (Lighter Pink)
- Sinful Colors: Snow Me White (White)
- Sinful Colors: Top Shine (Topcoat)
I only used these 4 'tools':
- Binder Rings
- Dotting Tool
- Cosmetic Sponges
- Toothpicks
Shattered Glass Nail (Middle Finger)
Step 1: Paint your middle finger 2-3 coats a sheer pink/white polish.

This is where things start to get a bit tedious, not gonna lie.
Step 2: Swipe your glitter nail polish onto a sponge to soak off excess jelly.
Step 3: Using a toothpick, pick out the pieces of glitter.
Step 4: Place glitter pieces around the nail.
NOTE: Ensure that pieces are not too close to each other, aren't overlapping but aren't too far apart.

Step 5: Add a topcoat and voila!
Half-Moon Manicure (Pinky and Pointer Finger)
There are 2 ways that I know of to do a Half-Moon Manicure. You can paint your nail the top colour (in my case pink) and go in with a nail art brush to paint the gold half moon.
My personal favourite way is to first paint the colour of the half moon and then paint the top colour as shown below:
Step 1: Paint your nail 2-3 coats of a gold polish.

Step 2: Once your nail is dry. Using binder rings, seal off the section you want to be gold and become the half moon.
Step 3: Paint 1-2 coats of pink onto the uncovered sections.

Step 4: Let it dry, add a topcoat and you're done.
I've looked around the internet and I've tried many different versions of roses and some of my favorites include the ones Bubzbeauty has done (click the link below)
Bubzbeauty's Rose Nail Tutorial
My current favorite way of doing rose nails is from the lovely blogger at 'Did My Nails' as shown in the image below:
 |
| http://www.didmynails.com/2013/02/vintage-rose-nail-art-tutorial.html |

Step 2: Using a pale pink polish, create as many random splodges on your nail as you like. This will be the centre of your roses.

Step 3: Draw a curved line running down the middle of the pink blob.
Step 4: Draw a line around the outside of 1/2 of the pink blob.
Step 5: Draw a line around the outside on the other 1/2 of the blob.
NOTE: Make sure the lines do not touch.

Step 6: Using a green polish, draw a line on each side of the roses.
Step 7: Draw another green line creating a small triangle.

Step 8: Using a dotting tool, dot white dots in areas with no roses.


Here's a gif I made showing the process of drawing the roses:

Remember to use a fast drying topcoat on all your designs so you can protect all your hardwork.
This is currently my favourite topcoat:
 |
| Sinful Colors; Top Shine |
Here's what the completed nails look like. Hope you enjoy :D

Voila! You are done! I hope you enjoyed the tutorial. Please feel free to leave comments telling me what you think, what you like and don't like and what tutorials you'd like to see next.
Until next time, byee ^-^
NOTE: I'm going to apologise, this is my first blog post so the pictures aren't of the best quality and I'm very sorry :(
It's really cute :D one thing, when you have a step that shows us what to do, could you enlarge it a bit more? It's a bit hard to read. Super cute <3
ReplyDelete- Fei
Sure thing, I know you can click on the picture but i'll set the pictures to extra large :D
Delete