DISCLAIMER: I did not come up with the glitter burnishing technique and only heard of it via Cristine aka SimplyNailLogical
Glitter Burnishing - What on earth is that?
Glitter burnishing is the process of applying loose glitter in a way that all the lovely glitter pieces lie flat on your nail. As a result you get a lot of lil goodies;
- Your nail has a nice smooth, professional finish instead of a jagged, rough surface.
- The glitter appears shinier when the light hits it.
Of course, like with chrome powder application a good way to do this is gel polish.
BUT BUT BUT
Here at TipsforFingertips, I like to find a cheat way to everything mostly because finding the goods in AU is pretty much impossible.
Fellow nail bloggers tell you to invest in a brand of basecoat known as 'Yellow Stopper'. The reason being that Yellow Stopper is a rubberized base coat and admittedly it is SO SO GOOD for Glitter Burnishing
As an Australian, everything is out of reach for us. So basically getting my hands on Yellow Stopper is a wee challenge. But I am determined to not let that stop me!
What have I discovered? You can actually burnish glitter with your normal, favourite topcoat.
SAY WHHHAAATTT?!!
Hear me out ok. The trick is to NOT dunk your nail in that beautiful glitter. Instead, find a tool that you can use to lightly sprinkle glitter with. Here are some suggestions:
- A teaspoon
- The flat end of your tweezers
- A tiny tiny spoon (I'm using one from a Barbie set...)
1. Now use your chosen utensil to sprinkle glitter all over your nail (yes it is probably going to end up all over your fingers)
2. IMMEDIATELY after you've sprinkled the glitter, take your ring finger and lightly stroke/brush the glitter into the surface of the nail.
Why the ring finger?
Your ring finger is the weakest finger on your hand, a lot of skin care and makeup tells you to use your ring finger to lightly apply product.
For us, by using the ring finger you apply enough pressure to flatten the glitter but not enough to smudge your base coat.
Once all the glitter has stuck to your topcoat, take a fan brush and lightly brush over the surface of your nail, all the excess will just fall off your finger.
So why does this technique work?!
Well, glitter burnishing is basically when you lie glitter flat on your nail. Using my cheat technique you are technically taking the glitter that is semi stuck and resting on your wet nail and lightly nudging it into the correct orientation.
Here is a little video from my Instagram account (@tipsforfingertips) showing how puretty burnished glitter looks:
Hello everyone :D I am back after a 3908502 month hiatus with some tips for you about the hottest trend in nail art - CHROME NAILS!!!
I'm sure you've seen it alllllll over Instagram and Pinterest these amazing chrome nails that basically look like tiny mirrors on your hands.
All pictures are NOT MINE and came from Pinterest - Look up Chrome Nails and they'll pop up
Hey how awesome is that, fix your makeup just by looking in your nails :D
Of course there are so many different types of chrome nails, there's the classic silver and gold, but my personal favourite is the multi-chrome.
Living in Australia is both a joy and honestly a pain for nail art enthusiasts like you and me, finding Multi-chrome and Holo (shoutout to my SimplyNailogical Lovers) is basically like painting the Mona Lisa on your nails, aka impossible.
Of course, good old Ebay has got us covered with a huuugggeeee selection of Multi-chrome and Holo powders.
Now, the truth is all the tutorials will tell you that you have to use a gel polish on top of chrome powders, allow me to show you why:
It's all shiny and puretty but as soon as you chuck on your favourite quick-dry topcoat it goes all spotty and gritty. Don't get me wrong the color is still GORGEOUS but the mirror effect is gone (⁎˃ᆺ˂)
Observe:
Pre-Topcoat
Post-Topcoat
While both nails still have the gorgeous multi-chrome action going on, notice how the 'mirror' effect is more prominent in the top picture whereas the nail in the bottom picture has gone a bit spotty?
Notice that you can see my reflection (or my phones' reflection more like) on the nail that wasn't topcoated? This is what happens if you apply a regular topcoat over chrome powder, the mirror effect goes away (⌣_⌣”)
Now, if you go on YouTube there are heaps of tutorials telling you how to conquer this issue and achieve chrome nails without the gel. The solution? Water Based Topcoat!
Duh amirite? It's so simple, so let's go get some Water Based Topcoat onli- HOLD THE PHONE IT'S $30 FOR A BOTTLE?! AND YOU DON'T SHIP TO THE AU?! (╯°□°)╯
Yeah, living in Australia is sometimes a real kick in the face to get the 'nail art must haves'.
What am I supposed to do now?! I just ordered gorgeous chrome powder and you're saying I have to splash at least $80 on a at home gel kit*?!
DO NOT FEAR FOR I HAVE A SOLUTION (with help from the internet).
So what's the secret?
Basically in order to maintain the mirror effect, we need to find either a topcoat that isn't your 'traditional nail polish topcoat' i.e water based. Or we need to find a way to create a barrier between the chrome polish and your favourite quick dry topcoat.
What's the weapon of choice?
Yes, the peel off basecoat has been going on for a while, but like every single good nail polish item on the market, it's super hard to get AU, either it ain't stocked anywhere or it doesn't ship to the AU or shipping costs $49000 dollars.
But I did stumble upon Sally Hansen's Big Peel Off Base Coat in both Priceline and Chemist Warehouse and bought it in a heartbeat.
This is the secret final step to getting those chrome nails without the gel. And also, you can peel off the nail polish when you're done with your mani - no nail polish removed needed, woot!
The chrome powder I've been using and basically entered into a serious relationship with is from this lovely shop on ebay:
If you do purchase from them, help a girl out and tell em or link them my blog, i will give 400000 internet hugs if you do <3
DISCLAIMER: I did not come up with this technique all by myself, there are heaps of videos on YouTube of how to do chrome nails without gel, this is what I've found works for me using the tools I can get easily in Australia.
Here are some videos that have helped be the catalyst to cracking the secret to chrome nails without the gel.
Be sure to leave all these lovely nail geniuses a big thumbs up on their videos ♥(ˆ⌣ˆԅ)
Without further a due, let's get on to the tutorial.
Step 1: Paint your nails with a basecoat (an ordinary or peel off will work)
Step 2: Paint your nails a solid black colour
Black is the 'traditional' colour that is used under chrome nails to get the look you see all over instagram, however don't be limited to this one color, wanna try it over pink? GO AHEAD!
Check out Elleandishs' video where she uses different base colours, check her video out here:
Now, pay close attention because this is where things get tricky!
Step 3: Paint your nails with your favourite quick dry topcoat.
You must wait until your topcoat is DRY TO THE TOUCH
WHAT DO YOU MEAN CHELSEA?! ヽ(#゚Д゚)ノ
Basically, you want your topcoat to be dry enough that with a light stroke or push with your finger it feels dry, however if you poke it will leave a dint. This is extremely important as this is the only way the powder will stick.
One of the reasons gel polish is recommended for chrome nails is because after the topcoat is dry, the nail is 'tacky' and the powder can stick.
So in summary;
Gentle Stroke -> No movement = Good
Light Push -> Sticky/Dents = BAD
Let me show you in these poorly made DIY at home videos:
This is the degree of dryness you want, dry to the gentlest touch
This is too early, notice that the polish sticks to your fingers and leaves a dinted residue?
Step 4: Once the topcoat is dry to the touch, using your FINGER gently rub the powder onto your nail.
HOLD UP CHELSEA WHY ARE WE USING MY FINGER AND NOT THE SPONGE APPLICATOR?!
The reason you are using your finger is because you are able to feel if you're pressing a lil too hard and are going to dent the polish. But don't fret, we will use the sponge applicator.
Step 5: Using the sponge applicator, 'press' the powder more securely into the polish and brush away excess powder until you achieve the mirror effect :D
Step 6: Apply at least 2 layers of the peel off base coat over the chrome powder.
This peel of base coat will act as the barrier between the chrome powder and the topcoat and prevent the mirror effect going bye-bye.
Don't worry, the basecoat dries clear :D
Step 7: Once peel of base coat is dry, apply your favourite quick dry topcoat.
My current top coat of choice
VOILA WE NAILED IT! o(*^▽^*)o
Here's some pictures of the mirror nails I've personally fallen in love with.
Now i'm not going to lie to you guys, the method I've written about is not 100% fool proof, it's still a little spotty but 100x better than using no base coat between.
A water based topcoat such as the one from Little Ondine will give the best results. However it is so hard to get our hands on it in the AU and I've found this is the best compromise with things all of us can get our hands on without breaking the bank.
I hope this helps you guys out, any questions about things that don't make sense, shoot me a message or comment and I'll do my best to clear it up.
Until next time, stay lovely <3
*I personally am not a fan of gel nails as I change my nails - a lot. However if you love to have a colour of nail polish stay on for longer, you slay with those gel nails girl
Hey everyone! I'm back with another update - but not another tutorial :(
I just wanted to let everyone know that if you are on Tumblr (like a lot of people I know) then you can now follow my Tumblr to see new nail art I post.
Tutorials are still going to be posted on the blog but I'll be sure to link the tutorial on my Tumblr.
Check out my Tumblr here: https://my-tips-for-fingertips.tumblr.com/
Hi everyone! ^-^
As you may or may not have noticed, I have made a new page called 'Nail Art Collection'. Here I'm going to be posting pictures of some of the nail art I have done :D
Please check it out on the tab above ~ PS: It took me embarrassingly long to get that page to work -_-
Now back to business. I'm sure by now, you've heard of the Shattered Glass Nails that are super popular, it started off in South Korea and has taken the world by storm.
2. You can also go to your local craft store and purchase a packet/sheet of iridescent cellophane.
This idea is awesome as it is a cheaper alternative and cellophane comes in massive sheets that will last for ages!
However, I've struggled to find cellophane as well as nail stickers that I was happy with (tbh I didn't really want to pay $10+ for it as well...) HOWEVER I was in my local Chemist/Drugstore the other day with my dear friend, and I stumbled upon this nail polish by W7.
W7: 167 Pink Flakes
This bottle of polish instantly stole my heart. It's pink, has huge pieces of iridescent glitter and best of all, it was only $2.99!!! I thought that I could pick out the pieces of glitter and use them to do my own take on the Shattered Glass Nails.
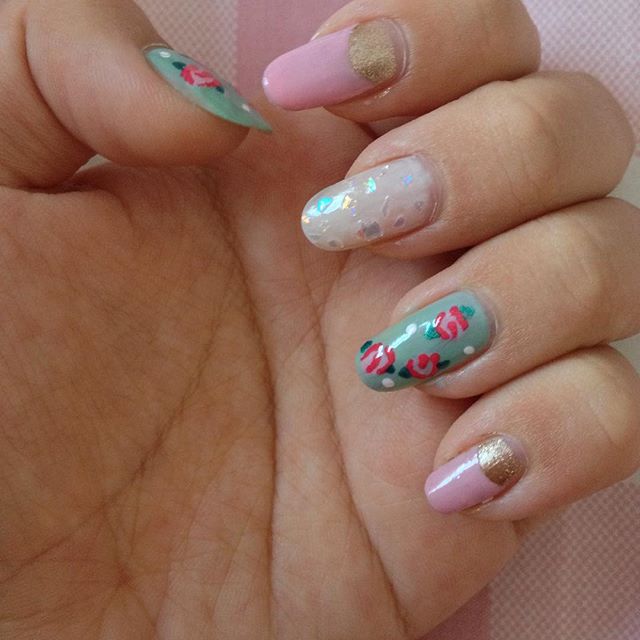
Ta-Dah!! I present to you my own take on the Shattered Glass Nail paired with Roses and a Half Moon Manicure. So without further ado, let's move on to the tutorial!
The colours I'll be using today are:
- Models Prefer: Money Money (Dark Green)
- Models Prefer: Sugar High (Pale Pink)
- OPI: Glitzerland (Gold)
- OPI: Charged Up Cherry (Hot Pink)
- Revlon: Eclectic (Blue/Green)
NOTE: Any blue/green polish works. I've used mint before (Revlon Jaded) and it looked awesome!
- Sally Hansen: First Blush (Lighter Pink)
- Sinful Colors: Snow Me White (White)
- Sinful Colors: Top Shine (Topcoat)
I only used these 4 'tools':
- Binder Rings
- Dotting Tool
- Cosmetic Sponges
- Toothpicks
Shattered Glass Nail (Middle Finger)
Step 1: Paint your middle finger 2-3 coats a sheer pink/white polish.
This is where things start to get a bit tedious, not gonna lie.
Step 2: Swipe your glitter nail polish onto a sponge to soak off excess jelly.
Step 3: Using a toothpick, pick out the pieces of glitter.
Step 4: Place glitter pieces around the nail.
NOTE: Ensure that pieces are not too close to each other, aren't overlapping but aren't too far apart.
Step 5: Add a topcoat and voila!
Half-Moon Manicure (Pinky and Pointer Finger)
There are 2 ways that I know of to do a Half-Moon Manicure. You can paint your nail the top colour (in my case pink) and go in with a nail art brush to paint the gold half moon.
My personal favourite way is to first paint the colour of the half moon and then paint the top colour as shown below:
Step 1: Paint your nail 2-3 coats of a gold polish.
Step 2: Once your nail is dry. Using binder rings, seal off the section you want to be gold and become the half moon.
Step 3: Paint 1-2 coats of pink onto the uncovered sections.
Step 4: Let it dry, add a topcoat and you're done.
Rose Nails (Thumb and Ring Finger)
I've looked around the internet and I've tried many different versions of roses and some of my favorites include the ones Bubzbeauty has done (click the link below) Bubzbeauty's Rose Nail Tutorial
My current favorite way of doing rose nails is from the lovely blogger at 'Did My Nails' as shown in the image below:
Step 1: Paint your nails 2-3 coats a blue/green polish.
Step 2: Using a pale pink polish, create as many random splodges on your nail as you like. This will be the centre of your roses.
Step 3: Draw a curved line running down the middle of the pink blob.
Step 4: Draw a line around the outside of 1/2 of the pink blob.
Step 5: Draw a line around the outside on the other 1/2 of the blob.
NOTE: Make sure the lines do not touch.
Step 6: Using a green polish, draw a line on each side of the roses.
Step 7: Draw another green line creating a small triangle.
Step 8: Using a dotting tool, dot white dots in areas with no roses.
Here's a gif I made showing the process of drawing the roses:
Remember to use a fast drying topcoat on all your designs so you can protect all your hardwork.
This is currently my favourite topcoat:
Sinful Colors; Top Shine
Here's what the completed nails look like. Hope you enjoy :D
Voila! You are done! I hope you enjoyed the tutorial. Please feel free to leave comments telling me what you think, what you like and don't like and what tutorials you'd like to see next.
Until next time, byee ^-^
NOTE: I'm going to apologise, this is my first blog post so the pictures aren't of the best quality and I'm very sorry :(
Hello everyone :D I'm so excited to announce that I will be publishing my very first post/tutorial very soon. Please stay tuned and I'm excited to hear what you all think.